Showing posts with label sketches. Show all posts

18 November, 2018

CKC November Challenge 2

Today the second and final official challenge for the November Counterfeit Kit Challenge and I'm the guest designer for this month too!  Still can't quite believe it TBH!

(PS - no idea why some of my text has a white BG - soz! 😢)

To recap, we are counterfeiting Citrus Twist's October 2018 Kit called "Little Things".
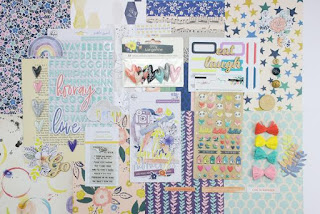


Challenge 2 is a sketch challenge appropriately also from Citrus Twists's blog.


The instructions for this sketch from Lisa are: "Place your own "twist" on it by rotating it, reversing, mirroring, turning it upside down, making it smaller or just doing your own "thing" to it - just don't use it as is!"

Naturally, this was one of the few sketches I liked as it was!  Well with more layers and embellies, obvs!
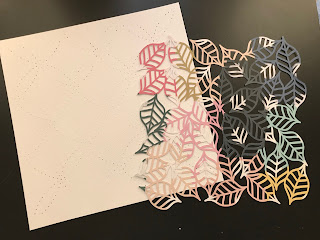
Anyway, since last month's forgery, I have been toying with ways of using a particular photo in such a way to keep as much of the background as possible showing.   

I had been stitching the gaps between the leaves (but more about that later!) and that allowed for thinking time.  The only thing I had decided for (almost) certain is the photo.  

The other cut file with the holes for hand stitching is for another day!


Upon seeing the sketch and having to twist it, changing two almost square photos to one landscape is a pretty obvious change.  😎

I also visualized it with a phrase or image card rather than journaling card.  

The cameras I cut from one of the papers in my kit isn't really a card, but the story here is about photography and the taking of this particular photo so the motif was repeated.

To me, using a detailed background is also a change even though the sketch doesn't specify.  It just seemed to me like a really minimalist design and the virtual absence of embellies (aside from causing me to hyperventilate) seemed to confirm that. 

I printed the photo smaller than 4x6 to leave as much space as possible.  I didn't use the paper strip across the top of the sketch and shifted the block with the paper layers, photo and 3x4 card up a bit higher.  

As soon as I had placed the block, I decided I wanted a smaller one at the bottom (natch).  If for no other reason than to have a place for more embellies! 🙈
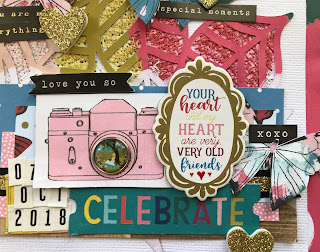
I really wanted to mix in some of the Alice papers and embellies without being too obvious since it wasn't actually inside the exhibition, but I wanted the continuity since this layout and another at the same location form part of the story about what we did for our anniversary.

There are more structural changes, but I think it's time we went back to THAT cut file and background.  

Like I mentioned last month, (and the one before) I was mixing up Autumn in the inspiration kits with it being Spring in the Southern Hemisphere.  In this case, it's a leaf cut file by Paige Evans which I cut using Paper 5 from Paige's Pick Me Up Collection wirh Pink Paislee.  The paper seemed to be quite springlike in colour!
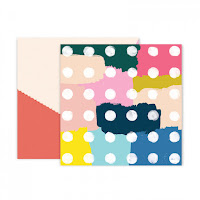
 
After cutting it, I put a pencil into the pen holder of the Silhouette and drew it onto white cardstock.  

At some point it occurred to me that messy stitching in the open areas using a similarly coloured thread would look pretty cool since I love texture as well as colour. I only did once section before I knew I had to come up with an idea to make the changes from one colour to the next easier to see...and white gaps between the coloured thread looked stupid.


I reached for the nearest watercolour set and lightly went over each section in the relevant colour.  This was especially useful when part of one leave changes colour or has a white section from the polka dot.


A wider zig-zag stitch made it easier to go in all directions which looked better.  Once I was done, the white dots looked weird and unfinished so I had to go back and do those too.

I wanted a coloured border behind the white background, and the remainder of the patterned paper after cutting the designed could be matted onto an ugly sheet of cardstock and had enough all the way around for a reasonable border.  It looks pretty cool after placing the leaf cut in the same orientation!


Since this is one layout of many of a particular event, I could get away with keeping the journaling short and telling more of the story on the facing page.

With the title split above and below the photo, I felt/hoped it looked balanced enough and added the date to the strips of paper at the bottom since that's a pretty important part of the story too! 


Early on, I decided butterflies were a must.  Like leaves they ad little to do with the story (at least not this part of it), but I do consider them a fdairly generic motif and I had the aptly named "Monarch" paper from Maggie Holmes Chasing Dreams in my kit begging to be fussy cut!  I did the same with the cameras from "Memories" (also from Chasing Deams),


An initial thought of a diagonal sprinkle of butterflies turned into scattering them about the leaves which looks kinda ok!  After adding a few more black work stickers I figured I might as well add one to each butterfly because more is more, right?


Some of the brads from the Alice in Wonderland collection had teeny tiny scenes and to me putting them into the lenses of the cameras made me think of the photos we took at the exhibition in a trippy ViewmasterXCanon hybrid type thing.  The one below has a clock.  And I added a rabbit.  See what I did there?  😜


Not being able to find my Heidi Shine meant I took it out on those poor glittery hearts from the Willow Thickers sheet. (soz!)


Ohh you want to see the whole layout, right?  OK well here it is!  Another exercise in how-much-can-you-cram-onto-one-page-and-still-gaze-wistfully-at-all-the-other-stuff-you-still-wanted-to-use.


Selfie...@ St Paul's


I think I even managed to position everything that at ;east a teeny tiny bit of each leaf colour can be seen.  It was a bit hard to cover the stitching after the physical and emotional pain it caused, but I think the end result is worth it!

See, that's one thing that really hit home during the making of this layout.  I don't have an issue with scrapbooking less than technically perfect photos.  If they tell the story then that's all that matters.

I also am finding that while I am throwing in a layout that uses mixed media or cut files or some other special technique more often, I normally save it for "special" photos.  Yeah my first thought is special occasions or maybe the artsy ones NotPinkCraftyHubster takes.

Yet somehow THIS photo ended up getting the special treatment and it doesn't fall into either category.  It's not a super special occasion like a wedding, but it was a special day in itself.  But this photo...firstly I don't look completely heinous so tat's always a plus, 😂 but it has all three of us which we have very few photos. 
And rather unexpectedly we realized that the location of the exhibition was eight across from St Paul's Cathedral where out wedding photographer took us when we had a pre-wedding photo shoot.


So the moral of the story is to see the value in those less-than-perfect snaps, because they may b more precious than you first realize!

Oh and one last thing...


Yeah he puts the "KIT" in kitty cat.  Just wish he wouldn't always try to sit on it (or in it n this case)


Love and stitchy sketches!


31 October, 2018

CKC Oct Challenge 2 and Victoria Marie Challenge

This will be the second and last layout using the October kit that I made for the Counterfeit Kit Challenge.

Well not last last because I plan to keep at least part of the kit, but last in the challenge window.  So what was the challenge exactly?  It was an interesting one for sure.  It's called "Show your Team Spirit" (but I can't help hearing the opening bars of a similarly titled Nirvana song every time I read those words!!) 😝😝😝

I don't support any kind of sporting teams, but when I read the part about mascots, logos and fight songs...I thought about Wonder Woman.  Not a mascot exactly, but I was still thinking about the superpower challenge I guess.

It also overlaps with a sketch challenge that Victoria Marie threw at her Facebook group while she was hosting a retreat.
 
I have to say I'm less than thrilled with the result of the layout.  I've been working on it pff and on for about the last 10 days.  It started well.  I chose the patterned paper called "Keepsake" from Maggie Holmes' "Chasing Dreams" line.  It was white, but with interest and texture.

On went the clear gesso without any hitches.  THEN chaos ensued after applying a lovely sparkly white embossing paste through a star stencil.  Stealth cat came and LAY DOWN ON IT!  😾😾😾


I wasn't sure whether I was more worried about the damage to my page, or having to pick out glittery goop from his belly fluff.  My shrieks didn't dislodge him, so I had to pick him up and fortunately for him the paste was touch dry and neither cat not paper sustained any damage.


I used regular Distress Inks and the "packaging technique" to add some colour and at this point I knew I wanted a darker paper as a mat for the whole thing.  I had to cheat because the best black ones in my kit were single-sided from paper pads and too thin to support the bulk of the paste and the paper layers I was going to add behind the photos.

Adhesive was a big issue and after trying several, I could see only stitching would hold down those pesky photos.  I went with gold thread and stitched the fussy cut hearts right onto the page.  Stitching them was always the plan, but initially I was going to chain stitch them then attach them.  This way they help adhere the two backgrounds also.


Title? Check! ✅ (and small cheat since I needed glittery Thickers)


Embellishment clusters?  Check! ✅ (another cheat since Shimelle's Glitter Girl sticker book was very necessary for this topic, but that's IT!  All the 8 paper layers behind the photos and the white background were from the kit as well as the scripty word "girl".

One of my goals was to use some of those word Thickers.  And the enamel dots have been appearing in every kit for months!

Here's where things went wrong.  I should have planned my journaling better.  Maybe drawn lines even.  I think my hands were shaky combined with trying to write on gesso with a Precision pen and dodging embossed stars was a disaster.  I used the thickest pen I had, but it was still too thin.


In the end I shaved off some of the stars with a craft knife and masked the messiest words by covering them with small alphas (not a cheat since I said I'd use them as needed from my stash).  I have used this technique before and to make it look more purposefu,l I covered other words and used a Sharpie to go over the remaining journaling.


I know my handwriting isn't the greatest, but it's mine and it makes a layout so much more personal with hand written journaling.  That's why I didn't use stickers for every word, but I did think about it.

Yes the journaling area is a mess and the lines don't match too well, but believe me when I say it's an improvement!  Mixed media on layouts isn't my go-to, but like cut files, I try it out sometimes and learn from each layout.

Little Girl Big Heart


The main thing is this special story about a very special little girl is told. 😘😘😘

Oh and that red and yellow W?  A cut file  I bought from Etsy and I was really nervous about whether the Cameo would even be able to cut such thin lines, because I scaled it right down to the right size for an embellishment.  Well, she performed beautifully!!  😍😍😍


Love, and WONDER-ful creating!


20 February, 2018

February Stick It Down/Scrap the Boys Collaboration Challenge


This month, Stick it Down and Scrap the Boys have collaborated and issued each other with a challenge.


One of these is this sketch challenge (not sure who issued to who, thought).  It's quite different to what I usually do.  Not in the least because it involves a cut file and I haven't got a Silhouette (yet - that might change this week...ETA may have already done so - eek!).

The heart (there is also a star) cut file reminded me of Paige Evans' "Paige Kit" from her first collection "Fancy Free".

I wasn't going to buy any of the kits because the're not really my style (at least they weren't when they first came out) and I certainly wasn't going to follow the kit as it was by just sticking the die cut onto the printed sheet with the different "papers" already there.  I didn't see the point.  There was so little left to do that I might as well buy a ready made scrapbook page.  I enjoy the process of scrapbooking not just the end result.


I bought two kits on purpose so I could cut up the triangles on one to use as templates.  I'm glad I did since I want to make this page again - perhaps in my wedding album.

It would have been easier to stick the pieces down onto the other printed sheet to keep the alignment perfect, but I still needed it so I stuck them to scrap paper and cut it all out when I was done.


There will always be a decrease in accuracy so a little jiggling was required but we got there in the end.

I thought 6x6 paper pads were the way to go and I went with Amy Tangerine's "Better Together" since I had two for some reason.  I also mixed in Paige Evans's "Oh My Heart" which blended quite well


I only glued lightly around the edge and stitched the inside bits down with a straight stitch on the sewing machine.


For some reason I felt smearing embossing paste around the outside of the heart would be a good idea.  It probably would have been but I keep forgetting that all types of paste marked "pearlescent" seem to dry a kinda silvery colour rather than the slightly shimmery pearl white I wanted. It meant gold accents were out of the question.  

They all looked stupid.


I think I wanted to cover more of the ombre green.  I don't usually use green but I was being brave today.  

Normally I have the ombre going top to bottom, but for some reason I like it going left to right and hoped I could journal in white on the darker side.  

This die cut was larger than the one on the sketch so to make enough room for everything else I wanted on the page I pushed it off the edge in 2 areas.

Once the past was dry and I lightly tacked down the large heart (which I put going off the page) I zig zag stitched the outer edge.


Next step was punching and/or die cutting (manually) all those hearts.  It sounds faster than it was!

Tack and stitch then layer papers behind the photo and figure out the extra stickers for the title.

This was supposed to go in our yearly family album, but each of the 3 or so stories I could think of seemed to fit in better with SmallCraftyDude's album.  The problem is I used pink on this layout and I challenged myself not to use it in his album.


 I was lamenting this when he told me it was OK and to go ahead and put it in his album and he didn't mind.

This is the same kid who on the first day of Year 8 flatly refused (at first) to hold the cut apart from Shimelle's "Starshine" collection called "Mariner".  He held up the number 7 with no issue the year before. 🤷
Max: No way am I holding THAT!
Me: Why not?  What's wrong with it?
Max: It's PINK!


Yes he was serious I'm sad to say.  Some death threats hissed in his ear and he reluctantly complied.

I decided to go easy on the pink for the punched hearts, layers and embellies after his generous concession.

The acetate part of the title needed to be stitched down in order to keep it in place and I liked the continuity of the stitching.  I also tried to keep loose threads where possible for continuity.


I wanted to include a few embellishments because I never don't want to and it was a bit tricky getting everything to "work" but we got thee in the end and I'm more or less satisfied.  It's the usual first-layout-in-a-long-time thing.


On the bright side, I'm starting another one today ad so far things have moved much more easily.

Well this Crafty Mama has a lot to get through today,  Some of it is fun like actually making and plenty is the more housekeepingy, behind-the-scenes boringness that goes with being a Crafty Mama.

love and successful scrapbooking!

29 November, 2017

CKC Challenge 2 and Mercy Tiara Sketch Challenge

Layout number four for my CKC November kit.  I suspect this will be the last one for my November kit.  Ironically the two sets of photos that I specifically wanted to scrapbook using this kit are still unscrapped.  Oh well.  These things happen. 

I have a couple of cards coming soon to change things up a bit so long as NCC* doesn't try to Halp too much.


This layout takes care of two challenges.  One is a mini challenge from Mercy Tiara's 27 Day Challenge.  The deets can be found in her Facebook Group


The mini challenge is a sketch challenge set by Moira O'Reilly.  Click on her name to go to her blog post detailing the challenge itself and the actual sketch.  The sketch comes from Kristine Davidson.  Kristine has a blog for sketches and a new book out (I believe this sketch comes from that book).


The second challenge is CKC Challenge 2 for November.  The title says it's about star signs which I don't "do", but using stars is an interpretation along those lines.  I used stars in place of most of the circles on the original sketch.


I also mirror imaged the sketch to allow for the direction in the photo.  The journalling proved a challenge given the the diagonal lines.  Rather than adding a journalling card or trying to write across the lines, I just went with the flow and used what was already there.


My Very Own Wonder Boy


I'm guessing most of you are familiar with the lovely Shimelle Laine and how she refers to her mini man as Wonder Boy so you should "get" the reference.  It's mentioned in the journalling which is why our very own SCD* is also a Wonder Boy in our eyes.


As soon as I saw him drinking from my Wonder Woman Mug, it his me.  As these things often do.


Please check back soon for some fun cards and more CKC madness once the December kit is revealed!


*Acronyms in the left Sidebar <---

Love and Happy Cat Wrangling


23 November, 2017

Stuck?! Sketches 1 Nov using November CKC Kit

So...I finally broke into my kit for November!  Well...the first thing I did was make 3 page kits last week, but didn't get around to actually chopping and sticking until three days ago. 

Finally had the energy to finish the thing! 

Quilty Cat


You can find the deets to the November CKC here.

So I kicked off with the sketch from 1 November from Stuck?! Sketches.  They release two per month and I hope to make a layout for the second one too.

The sketch looks like this and while I originally printed three photos, one of them (while taken in the same series) just looked too different and out of place.


The warm colours that make up so much of my Counterfeit Kit for November was perfect for this photo.  I don't use orange an awful lot - especially in such a large expanse so it was a challenging layout, but the orange isn't harsh,  It's a softer orange with watercolour streaks through it.

I decided to cut it to the exact size I'd need and mount everything onto a sheet of carstock I knew I would probably never use.  I declare that's not cheating).  


I also went into my scrap box for a bit of white (with black text) paper to mount the photos on.  (also not cheating since scraps are a bonus if you actually use them!)


I have to confess I very nearly cheated for real when I tuned to my stash of Sassa embellies since I knew some of the Whimsies had a fabric like texture.  They were just too big.  


The chipboard flowers in the kit had a little fabric texture so adding a fabric brad from my trusty pink tray (along with flower shaped buttons from there) helped get that vibe across.  

BTW several of the patterns in the Hustle and Heart collection by Amy Tangerine (I used a red behind the photos) have a pattern that sort of reminded me of a knitted jumper (sweater).

I gathered together a bunch of die cuts from that pile of extras and made three slightly awkward, but OK looking clusters.


The borders on the top and bottom of the page are two sides of the same paper and I found a section of the colourful one without green since I didn't want add it in...and it looks a but like a somewhat crazy quilt!


I'm a little late with my blog posts due to technical difficulties so please stop by often this week since I have another two layouts make with the kit and hope to get a fourth done.

Love and successful scrapping!